Fall is here and with it comes the perfect opportunity to celebrate the season with autumn pumpkin nails. Whether you’re looking for cute and simple designs or something more elaborate, there’s a pumpkin-themed manicure for every style. From short to long nails, and from acrylics to natural, we’ll explore a variety of art and ideas to inspire your next nail appointment. Are you ready to dive into the world of fall nail art? Let’s explore some fabulous fall pumpkin nail designs that will make your nails the center of attention for the season.
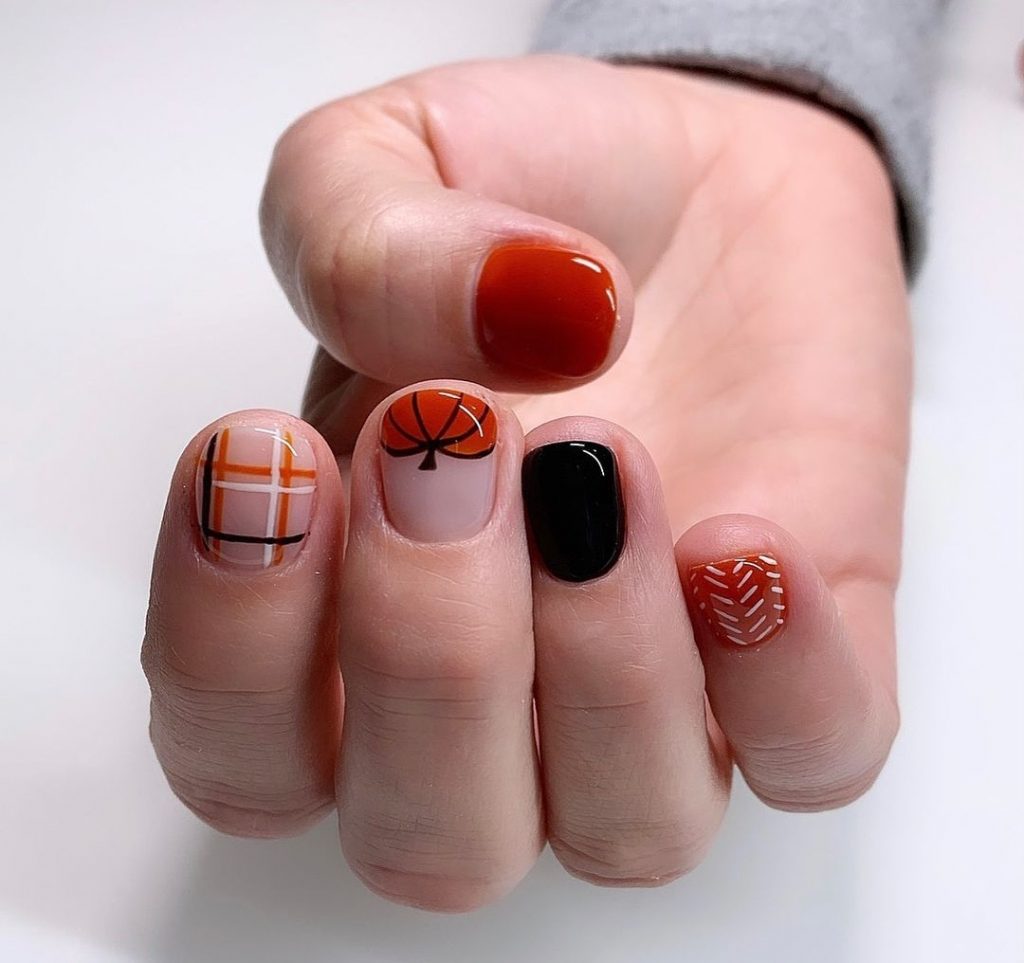
Cozy art with plaid and pumpkins
In this design, the nails are adorned with a charming combination of plaid and pumpkin motifs. Warm shades of orange and brown create a cozy autumnal feel, perfect for the fall season. The short nails feature intricate plaid patterns, a pumpkin-detailed nail, and a pop of black for contrast, making this design chic and cute.
Consumables
- Orange nail polish (e.g. OPI “A Good Man-darin is Hard to Find”)
- Brown nail polish (e.g. “Don’t Sweater It” by Essie)
- Black nail polish (e.g. Sally Hansen’s “Black Out”)
- Nail art brushes for detailing
- Top coat to seal the design.
DIY instructions
- Start by applying a base coat to protect your nails.
- Paint each nail with a solid base color, alternating between orange and brown.
- Using a thin nail art brush, create checkered patterns on the orange nails with brown and black lines.
- On one accent nail, paint a pumpkin design using orange and green polish.
- Finish with a top coat to seal and protect your art.
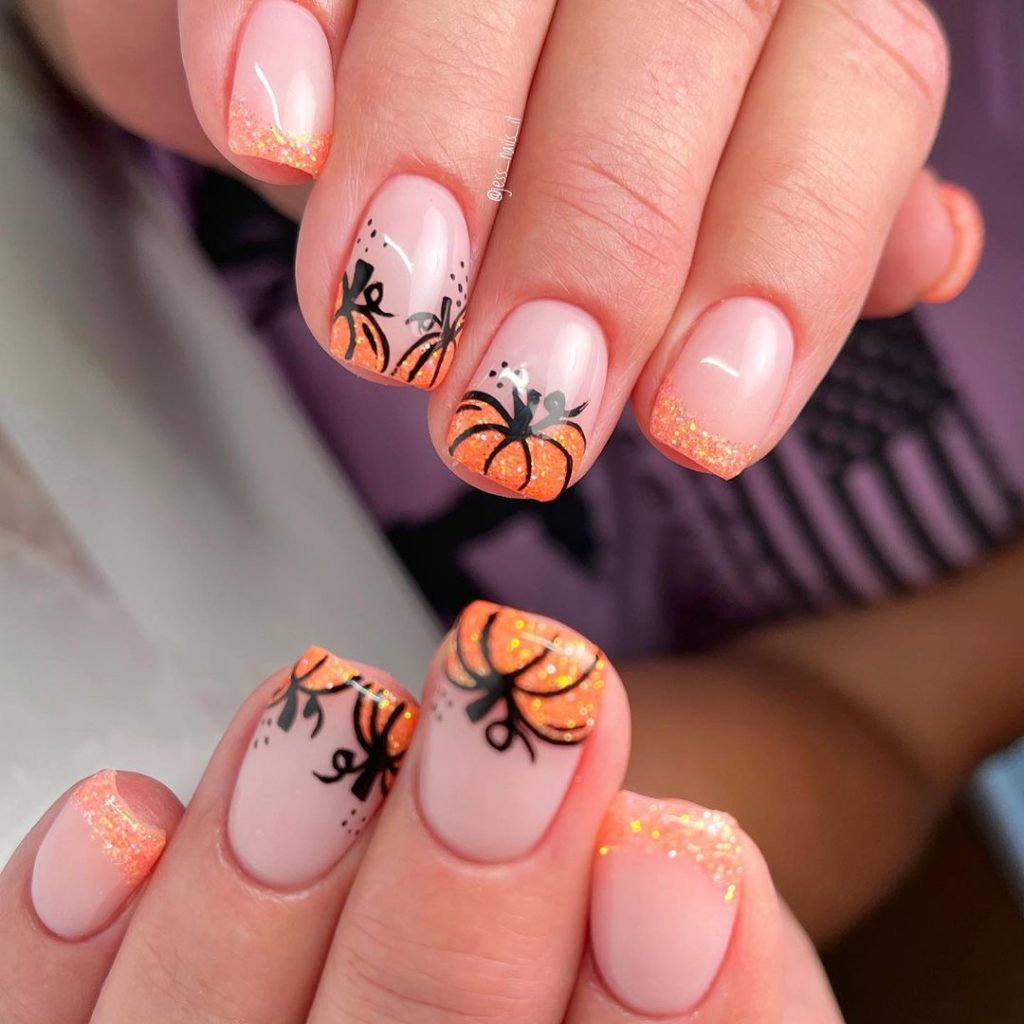
Sparkly Pumpkin French Tips
This design features autumnal pumpkin nails with a twist on the classic French tip. The tips are highlighted with orange glitter and adorned with a delicate pumpkin design, making these nails perfect for a festive yet elegant look. The short nails and neutral base allow the glitter and pumpkins to stand out beautifully.
Consumables
- Neutral-based nail polish (e.g. Essie Ballet Slippers)
- Orange glitter polish (e.g. China Glaze “Orange You Hot?”)
- Black nail polish for details (e.g. Sally Hansen’s “Black Out”)
- Nail art brushes for detailing
- Top coat to seal the design.
DIY instructions
- Apply a base coat to all nails.
- Paint your nails with a neutral base color.
- Using a thin brush, apply orange glitter polish to the tips of your nails in a French tip style.
- Add pumpkin designs to your accent nails using black nail polish.
- Seal the design with a top coat.
Matte green and pumpkin accents
This design features a gorgeous matte green base with delicate pumpkin detailing. Almond-shaped nails are perfect for those who love a sophisticated and unique style. The green color is complemented by a detailed pumpkin design, which adds a touch of autumnal charm.

Consumables
- Matte green nail polish (e.g. OPI “Suzi – The First Lady of Nails”)
- Black nail polish for details (e.g. Sally Hansen’s “Black Out”)
- Nail art brushes for detailing
- Top coat to seal the design.
DIY instructions
- Apply a base coat to protect your nails.
- Paint all nails with a matte green polish.
- Using a thin brush, add pumpkin designs to your accent nails using black polish.
- Finish with a matte top coat to seal the design.
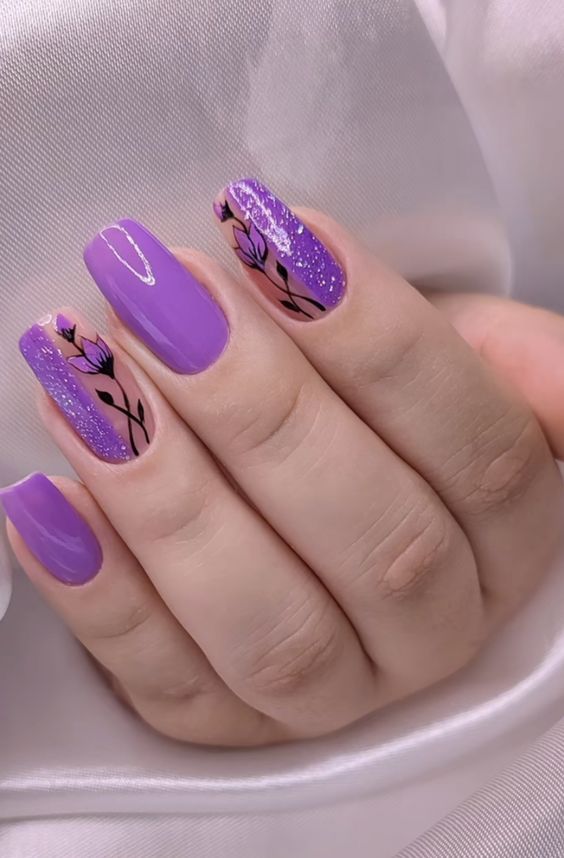
Glamorous purple pumpkin
For a bold and glamorous look, this design features a bold purple base with glitter and pumpkin details. Long nails are ideal for those who want to make a statement with their fall manicure. The combination of solid purple, glitter, and pumpkin details creates a striking effect.
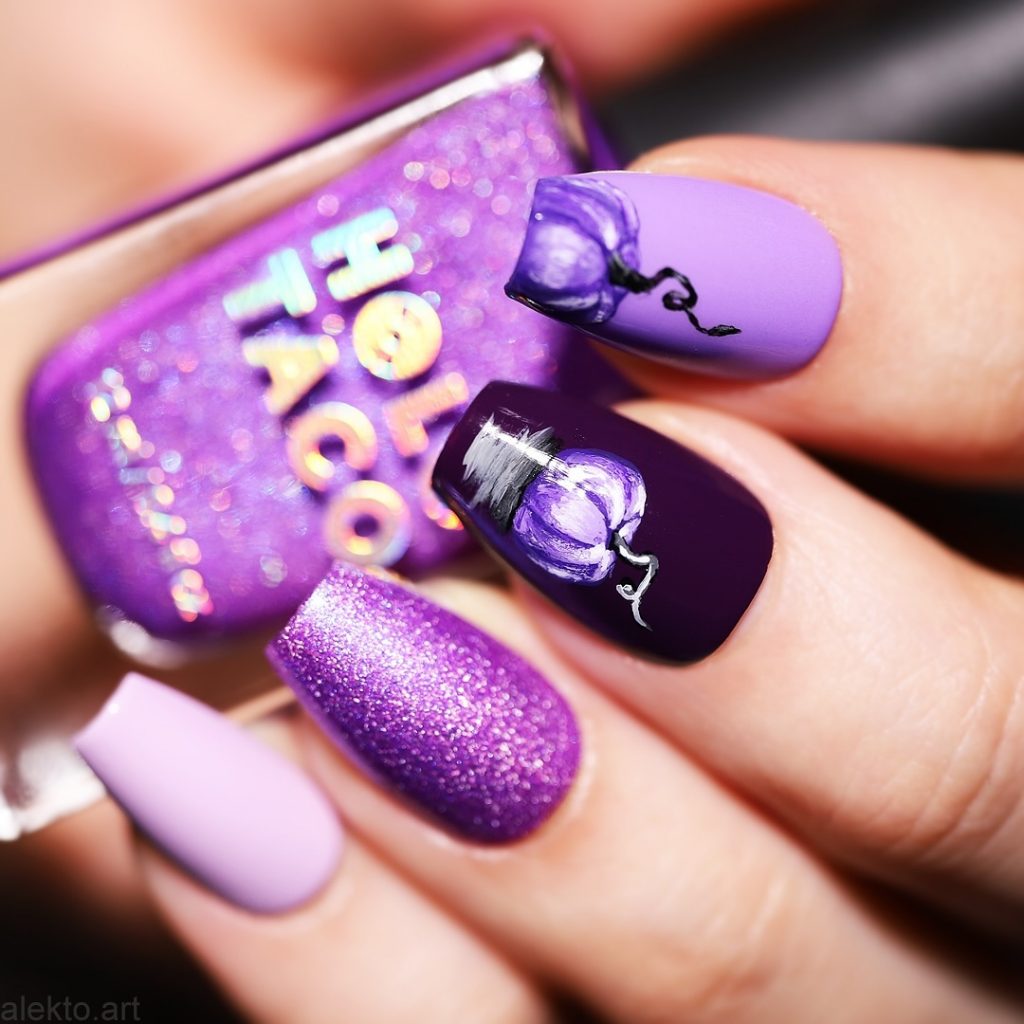
Consumables
- Purple nail polish (e.g. Essie “Play Date”)
- Purple glitter polish (e.g. China Glaze “CG in the City”)
- Black nail polish for details (e.g. Sally Hansen’s “Black Out”)
- Nail art brushes for detailing
- Top coat to seal the design.
DIY instructions
- Start with a base coat to protect your nails.
- Paint your nails with a purple base color.
- Apply purple glitter polish on selected nails.
- Use a thin brush to add pumpkin designs with black polish on your accent nails.
- Seal the design with a top coat.
Pumpkin nails for sweater weather
This cozy design combines the texture of sweater patterns with an adorable pumpkin design. The acrylic nails feature a mix of orange and neutral tones, creating a warm and cozy style perfect for fall. The combination of matte and glossy finishes adds depth and interest to the design.
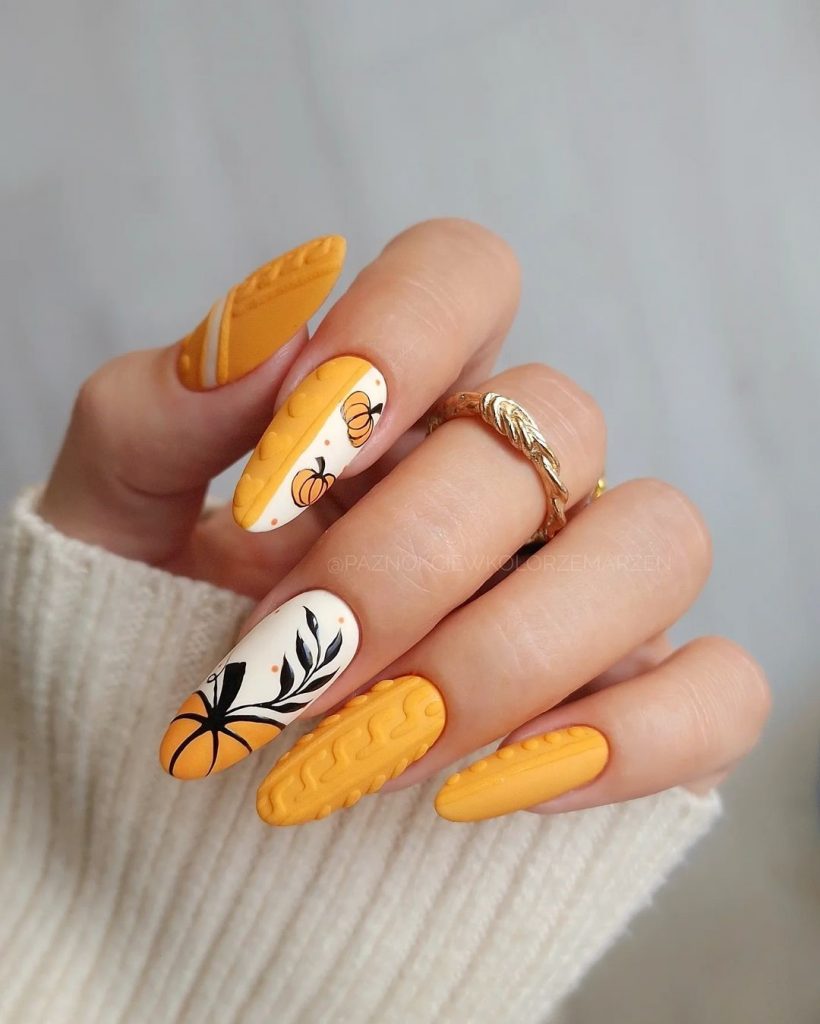
Consumables
- Orange nail polish (e.g. OPI “A Good Man-darin is Hard to Find”)
- Neutral-based nail polish (e.g. Essie Ballet Slippers)
- Black nail polish for details (e.g. Sally Hansen’s “Black Out”)
- Nail art brushes for detailing
- Top coat to seal the design.
DIY instructions
- Apply a base coat to all nails.
- Paint some nails with a neutral base color and others with orange.
- Use a thin brush to create sweater patterns on orange nails.
- Add pumpkin designs to your accent nails using black nail polish.
- Finish with a top coat to seal the design.
Elegant pumpkin and plaid
This design combines the elegance of green with the charm of pumpkins and plaid. Long nails are perfect for showing off detailed designs, with a deep green polish and nails accented with pumpkins and plaid. This look is ideal for those who want a sophisticated yet festive fall manicure.
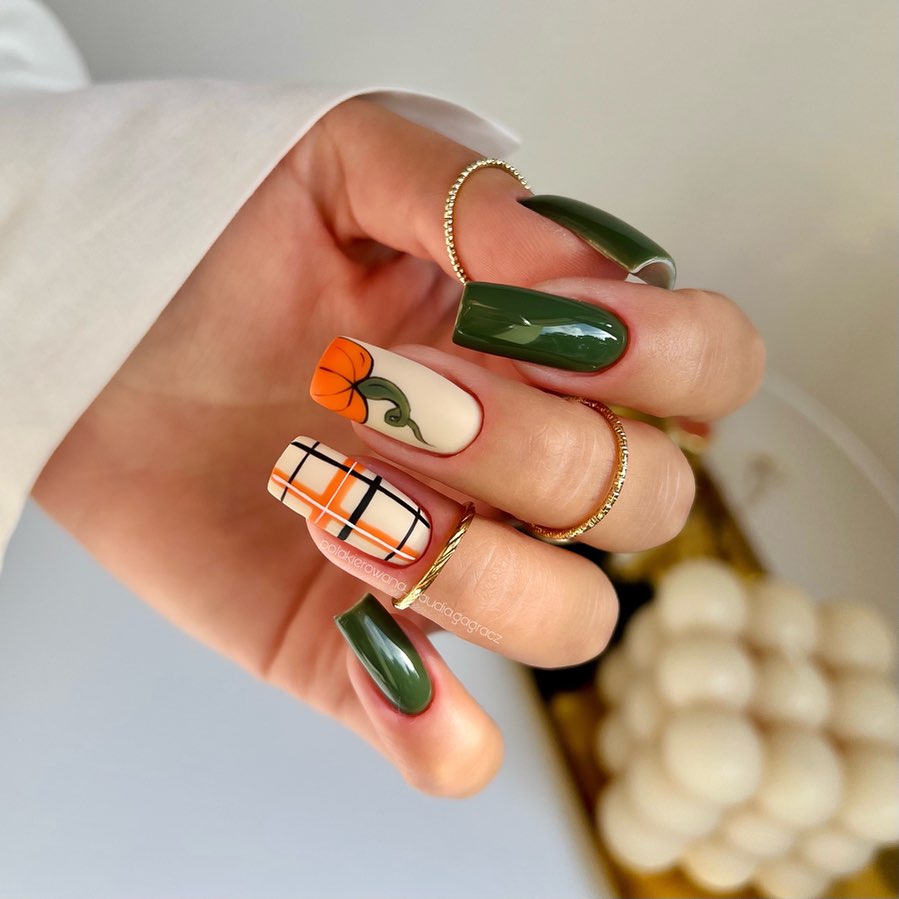
Consumables
- Green nail polish (e.g. OPI “Stay Off the Lawn”)
- Orange nail polish (e.g. “Meet Me at Sunset” by Essie)
- White nail polish (e.g. Sally Hansen “White On”)
- Nail art brushes for detailing
- Top coat to seal the design.
DIY instructions
- Apply a base coat to all nails.
- Paint your nails with a green base color.
- Use a thin brush to create checkered patterns on your accent nails with white and orange polish.
- Add pumpkin designs on another accent nail using orange and green polish.
- Seal the design with a top coat.
Glitter and pumpkin fun
This design features a fun combination of orange, brown, and glitter. The short nails are adorned with pumpkins, glitter, and geometric patterns, making them perfect for those who love a little sparkle and fun in their fall nail art.
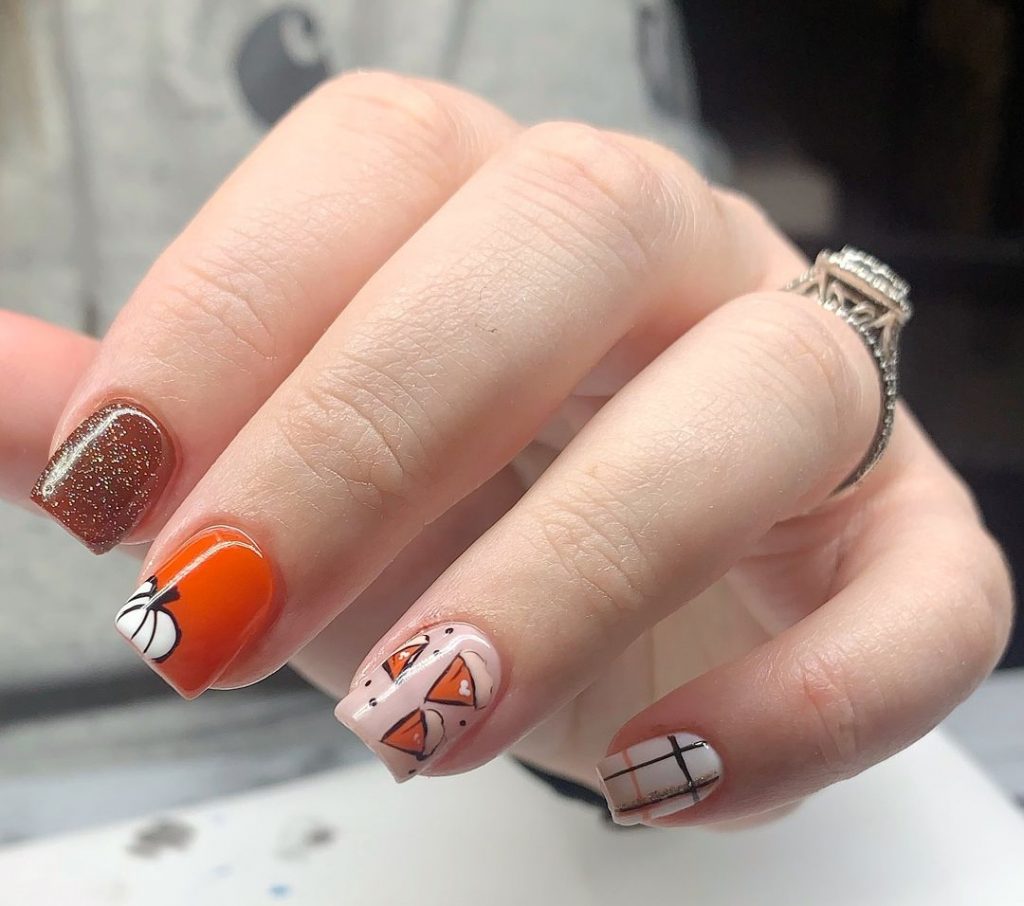
Consumables
- Orange nail polish (e.g. OPI “A Good Man-darin is Hard to Find”)
- Brown glitter polish (e.g. Essie “Rock at the Top”)
- Black nail polish for details (e.g. Sally Hansen’s “Black Out”)
- Nail art brushes for detailing
- Top coat to seal the design.
DIY instructions
- Start with a base coat to protect your nails.
- Paint your nails with a mix of orange and brown glitter polish.
- Use a thin brush to add pumpkin designs and geometric patterns on your accent nails.
- Finish with a top coat to seal the design.
Sparkling Pumpkin Delight
This design combines a bright green polish with a cute pumpkin detail. Short nails are perfect for those who want a simple yet eye-catching fall manicure. The speckled background and vibrant pumpkin design make this design stand out.
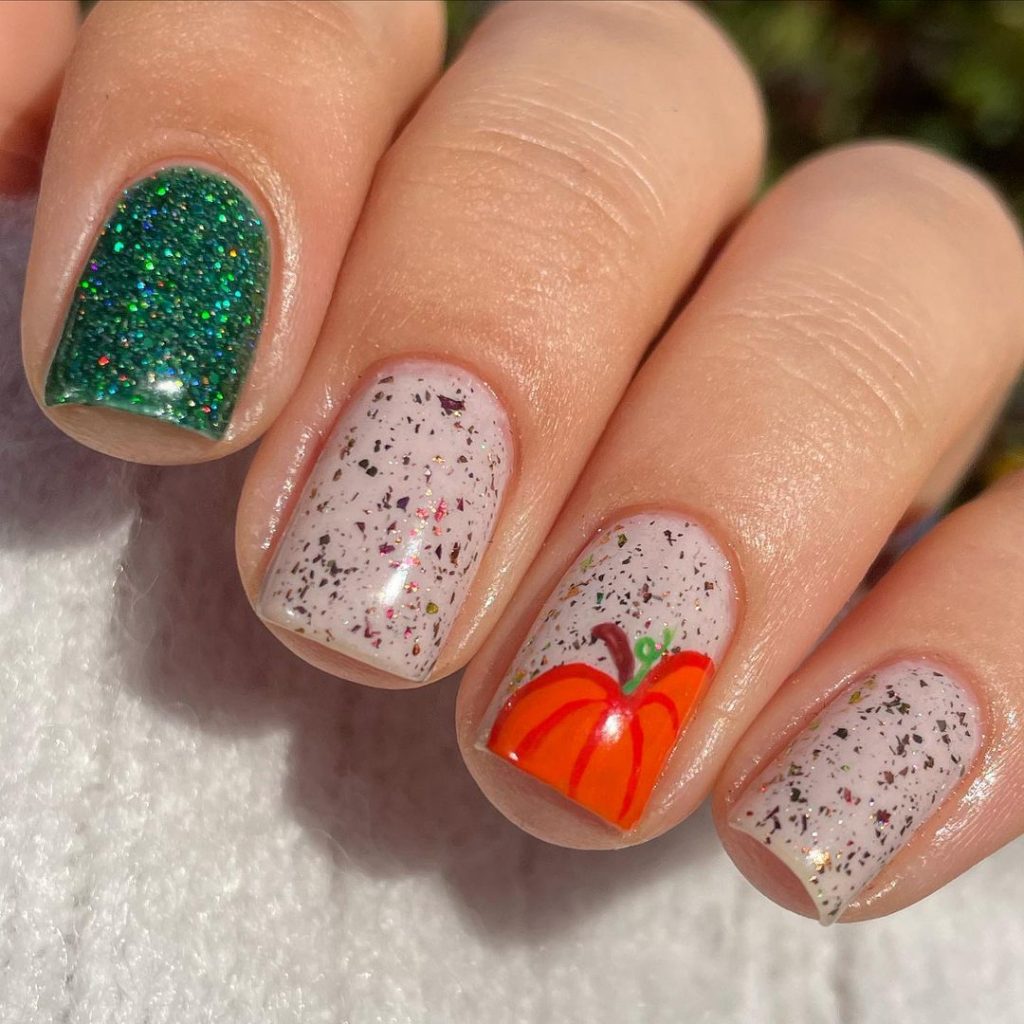
Consumables
- Green glitter polish (e.g. China Glaze “Emerald Sparkle”)
- White speckled nail polish (e.g. Essie “Pearlfection”)
- Orange nail polish (e.g. OPI “A Good Man-darin is Hard to Find”)
- Nail art brushes for detailing
- Top coat to seal the design.
DIY instructions
- Apply a base coat to all nails.
- Paint one nail with bright green polish and the others with speckled white polish.
- Use a thin brush to add a pumpkin design to an accent nail with orange and green polish.
- Seal the design with a top coat.
Classic plaid and pumpkin combination
This design features a classic plaid pattern combined with pumpkin motifs. Long nails are ideal for showing off detailed designs, with a combination of orange, black and white creating a timeless autumn look. The plaid and pumpkin motifs make this design perfect for fall.
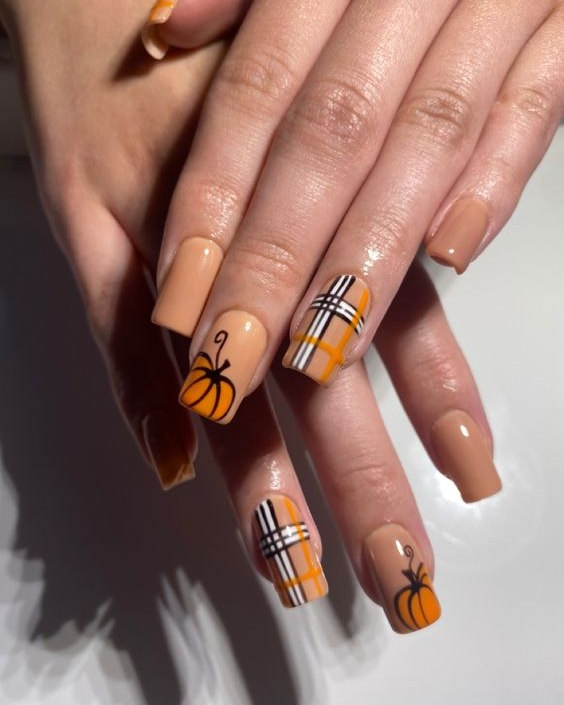
Consumables
- Orange nail polish (e.g. “Meet Me at Sunset” by Essie)
- Black nail polish (e.g. Sally Hansen’s “Black Out”)
- White nail polish (e.g. Essie “Blanc”)
- Nail art brushes for detailing
- Top coat to seal the design.
DIY instructions
- Apply a base coat to all nails.
- Paint some nails with an orange base color and others with a white base color.
- Use a thin brush to create checkered patterns on white nails with black and orange polish.
- Add pumpkin designs to your accent nails using orange and black nail polish.
- Seal the design with a top coat.
Elegant autumn mix
This design features a combination of pumpkins, leopard prints, and fall leaves on short nails. The variety of patterns and the use of black, white, and brown make this manicure modern and versatile for the fall season.

Consumables
- Black nail polish (e.g. OPI “Black Onyx”)
- White nail polish (e.g. Sally Hansen “White On”)
- Brown nail polish (e.g. Essie “Clothing Option”)
- Nail art brushes for detailing
- Top coat to seal the design.
DIY instructions
- Start with a base coat to protect your nails.
- Paint your nails with a mix of black, white and brown polish.
- Use a thin brush to add leopard prints, pumpkin designs, and fall leaves to your accent nails.
- Finish with a top coat to seal the design.
Elegant black and pumpkin stripes
This design features a chic combination of matte black nails with vibrant gold and pumpkin stripes. The short nails are perfect for those who prefer a simple yet eye-catching look for the fall season. The pumpkin art adds a festive touch, while the gold stripes bring a touch of sparkle.
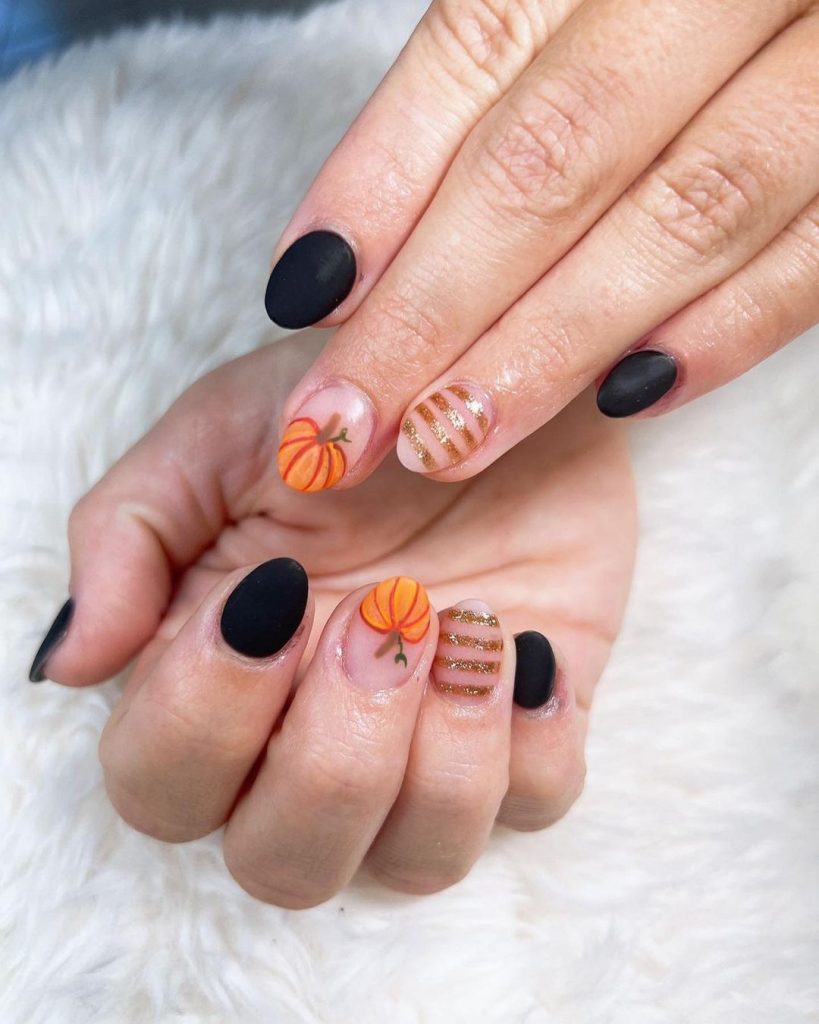
Consumables
- Matte black nail polish (e.g. OPI “Matte Top Coat”)
- Orange nail polish (e.g. “Meet Me at Sunset” by Essie)
- Gold glitter polish (e.g. China Glaze “Golden Enchantment”)
- Nail art brushes for detailing
- Top coat to seal the design.
DIY instructions
- Apply a base coat to all nails.
- Paint some nails with matte black polish and others with a clear base coat.
- Use a thin brush to add pumpkin designs and gold glitter stripes on clear nails.
- Finish with a matte top coat on black nails and a regular top coat on decorated nails.
Long and artistic pumpkins
This design features long nails with an intricate pumpkin design and elegant brown patterns. Long acrylic nails are ideal for those who want a dramatic and artistic fall look. The combination of brown, orange, and neutral shades creates a sophisticated and eye-catching manicure.
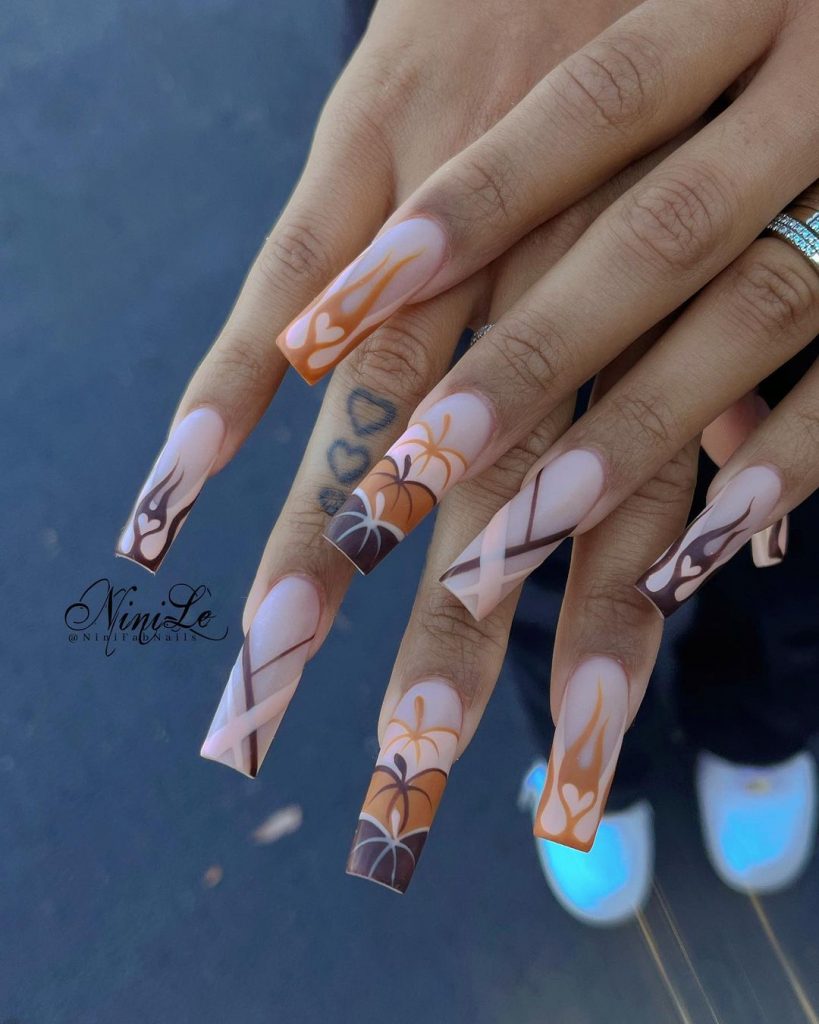
Consumables
- Brown nail polish (e.g. Essie “Clothing Option”)
- Orange nail polish (e.g. OPI “A Good Man-darin is Hard to Find”)
- Neutral-based nail polish (e.g. Essie Ballet Slippers)
- Nail art brushes for detailing
- Top coat to seal the design.
DIY instructions
- Apply a base coat to protect your nails.
- Paint your nails with a neutral base color.
- Use a thin brush to create pumpkin designs and brown patterns on your nails.
- Seal the design with a top coat.
Glamorous green and gold pumpkin
This design features a beautiful combination of green and gold with a vibrant pumpkin design. Almond-shaped nails are perfect for those who love a sophisticated and glamorous style. The green polish is complemented by gold leaf detailing and a detailed pumpkin design, making this design stand out.
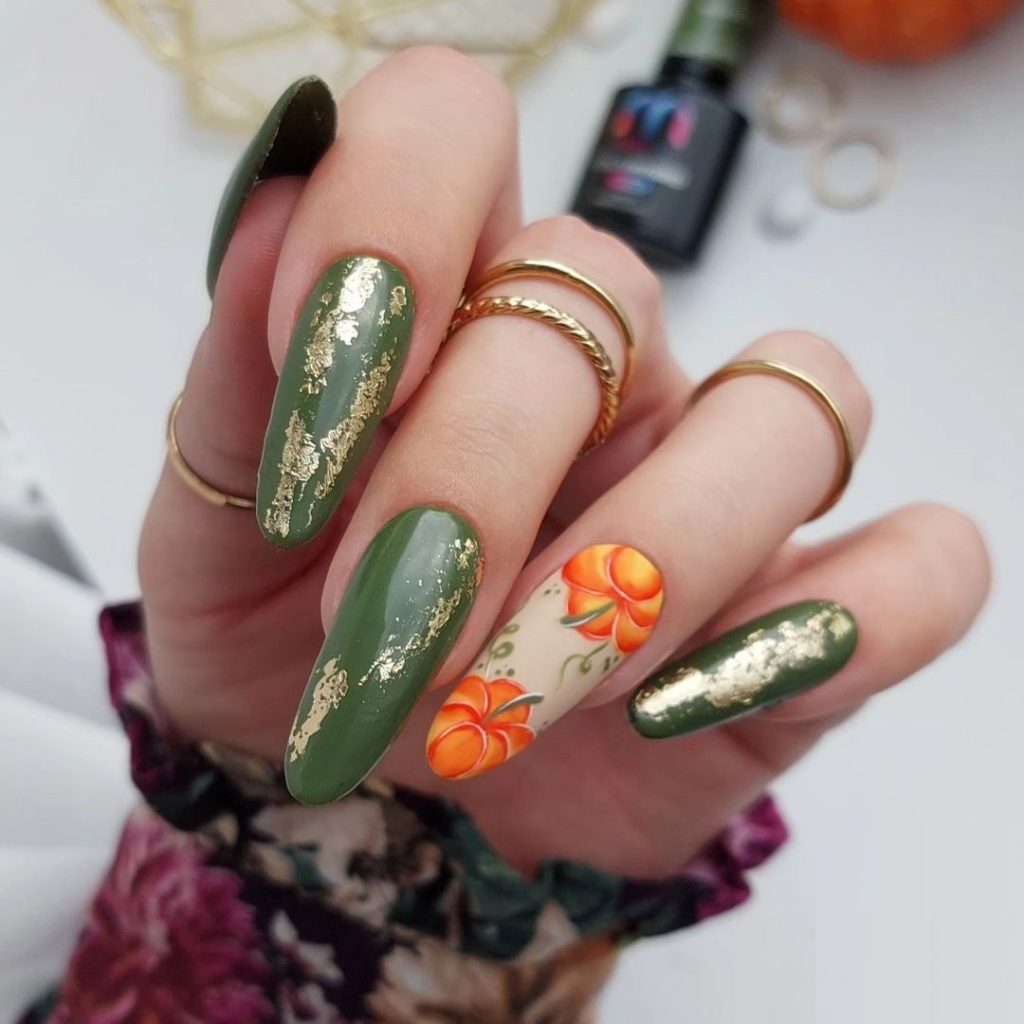
Consumables
- Green nail polish (e.g. OPI “Stay Off the Lawn”)
- Gold leaf sheet
- Orange nail polish (e.g. “Meet Me at Sunset” by Essie)
- Nail art brushes for detailing
- Top coat to seal the design.
DIY instructions
- Apply a base coat to protect your nails.
- Paint your nails with a green base color.
- Apply a sheet of gold leaf to selected areas for a touch of glamour.
- Use a thin brush to add pumpkin designs to an accent nail with orange polish.
- Finish with a top coat to seal the design.
Pink and Black Pumpkin Elegance
This design combines elegant pink hues with black accents and an intricate pumpkin design. Long nails are perfect for those who want a chic and stylish fall look. The pink and black color combination creates a sophisticated and modern manicure.
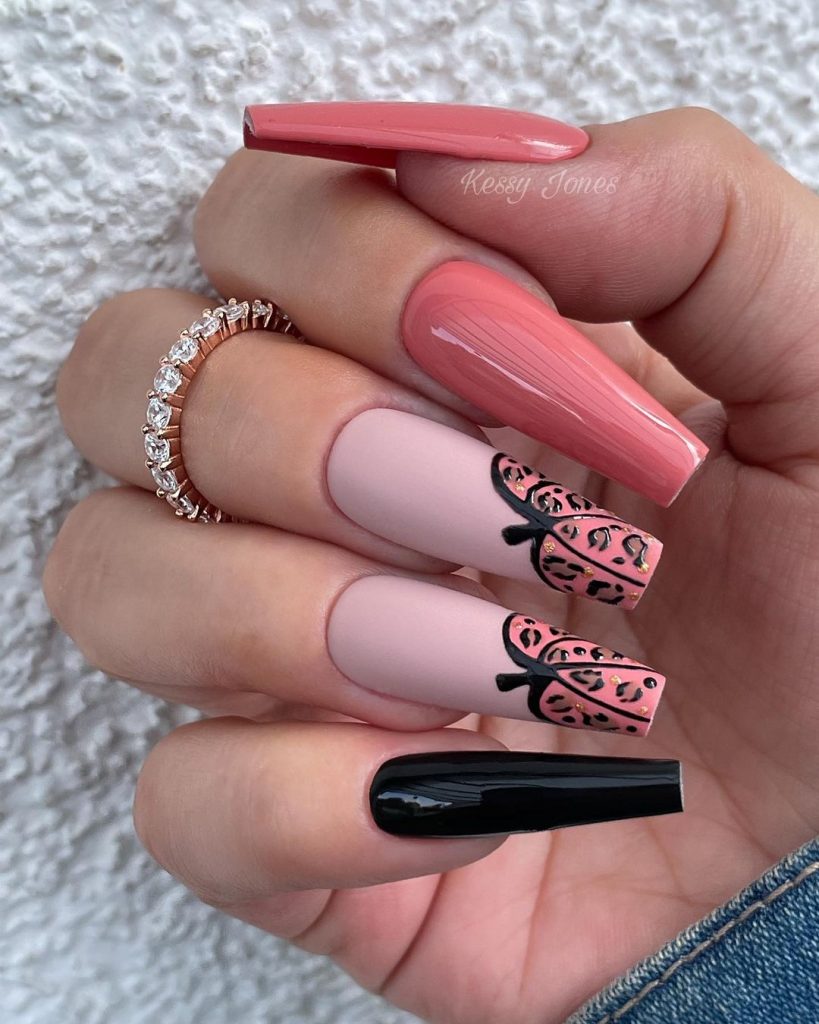
Consumables
- Pink nail polish (e.g. Essie “Sugar Daddy”)
- Black nail polish (e.g. OPI “Black Onyx”)
- Nail art brushes for detailing
- Top coat to seal the design.
DIY instructions
- Apply a base coat to all nails.
- Paint your nails with a mix of pink and black polish.
- Use a thin brush to add pumpkin designs and black accents on pink nails.
- Seal the design with a top coat.
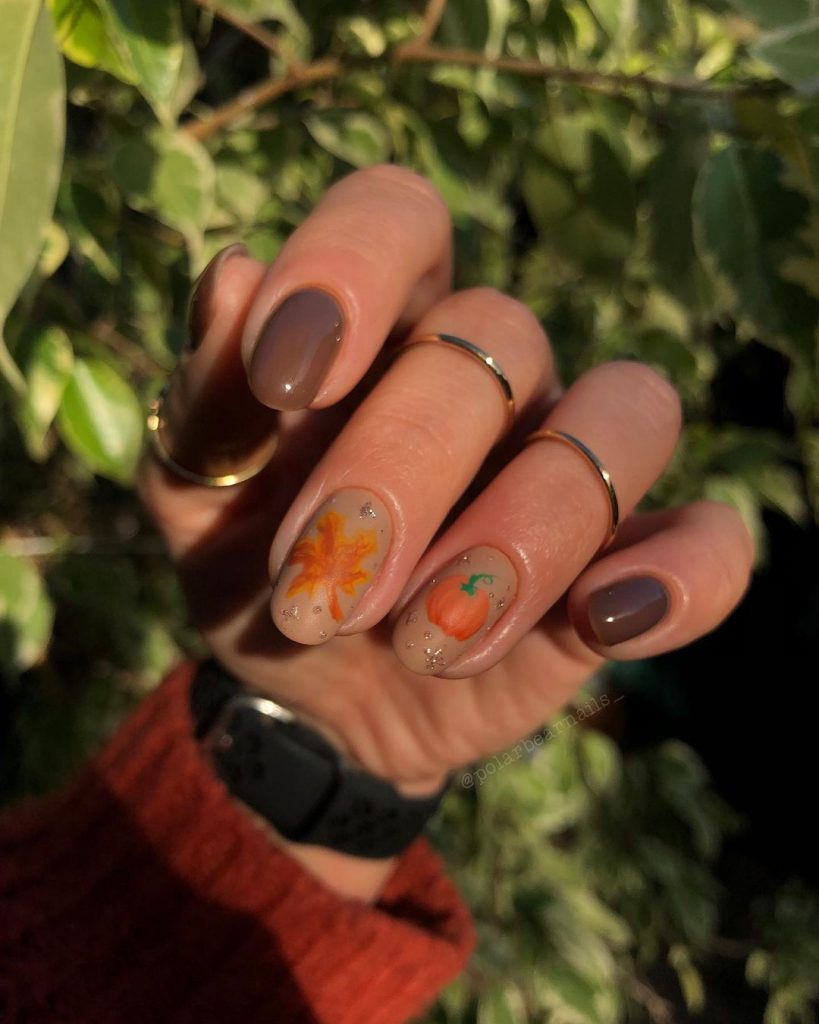
Cozy Fall Pumpkin Art
This design features cozy fall-themed pumpkin art with a combination of brown and teal accents. The almond-shaped nails are perfect for showing off detailed art, and each nail tells a story of autumnal coziness. The warm colors and intricate designs make this manicure perfect for the season.
Consumables
- Brown nail polish (e.g. Essie “Clothing Option”)
- Teal nail polish (e.g. OPI “This Isn’t Greenland”)
- Nail art brushes for detailing
- Top coat to seal the design.
DIY instructions
- Apply a base coat to protect your nails.
- Paint your nails with a neutral base color.
- Use a fine paintbrush to add pumpkin designs and fall-themed accents with brown and teal glaze.
- Finish with a top coat to seal the design.
Whimsical art with mushrooms and pumpkins
This design features a whimsical mushroom and pumpkin design on short nails. The fun, colorful elements add a playful twist to the traditional fall manicure, with red mushrooms and orange pumpkins on a neutral base.

Consumables
- Neutral-based nail polish (e.g. Essie Ballet Slippers)
- Red nail polish for fungus (e.g. OPI “Big Apple Red”)
- Pumpkin orange nail polish (e.g. Essie “Meet Me at Sunset”)
- Green nail polish for the stems (e.g. OPI “Stay Off the Lawn”)
- Nail art brushes for detailing
- Top coat to seal the design.
DIY instructions
- Apply a base coat to all nails.
- Paint your nails with a neutral base color.
- Use a fine brush to create mushroom and pumpkin designs with red, orange, and green polish.
- Finish with a top coat to seal the design.
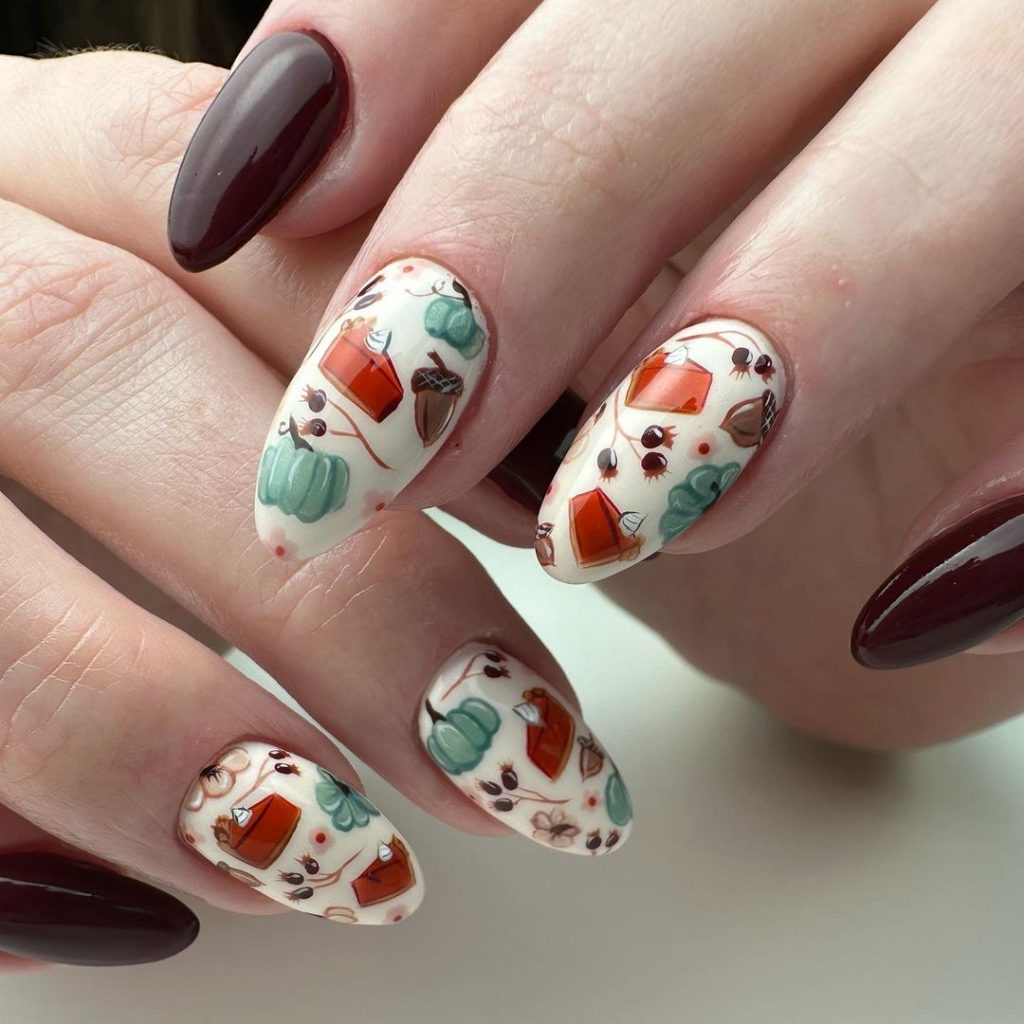
Autumn leaves and pumpkins
This design combines fall leaves and pumpkins on a brown base, perfect for a cozy autumn look. The short nails feature leaf and pumpkin details, making them ideal for celebrating the fall season.
Consumables
- Brown nail polish (e.g. Essie “Clothing Option”)
- Pumpkin orange nail polish (e.g. OPI “A Good Man-darin is Hard to Find”)
- Yellow and red leaf nail polish (e.g. Sally Hansen “Mellow Yellow” and “Cherry Red”)
- Nail art brushes for detailing
- Top coat to seal the design.
DIY instructions
- Apply a base coat to protect your nails.
- Paint your nails with a brown base color.
- Use a fine brush to create leaf and pumpkin designs with orange, yellow, and red polish.
- Seal the design with a top coat.
Multicolored pumpkin art
This design features multi-colored pumpkins on a mix of matte and glossy backgrounds. The long nails are perfect for showing off the intricate floral and pumpkin art, with a combination of soft pastels and metallic details.

Consumables
- Matte top coat (e.g. OPI “Matte Top Coat”)
- Glossy top coat (e.g. Seche Vite Dry Fast Top Coat)
- Nail polishes in pastel shades (e.g. Essie “Mint Candy Apple”, “Lilacism”)
- Gold glitter polish (e.g. China Glaze “Golden Enchantment”)
- Nail art brushes for detailing
- Top coat to seal the design.
DIY instructions
- Apply a base coat to all nails.
- Paint your nails with a mix of pastel colors.
- Use a fine paintbrush to add multi-colored pumpkins and floral designs.
- Apply a matte top coat on some nails and a glossy top coat on others to create contrast.
Leopard and pumpkin print
This design combines black and neutral tones with leopard and pumpkin prints for an on-trend fall look. Short nails are perfect for those who love a mix of patterns, with bold black and animal prints popping against a neutral base.
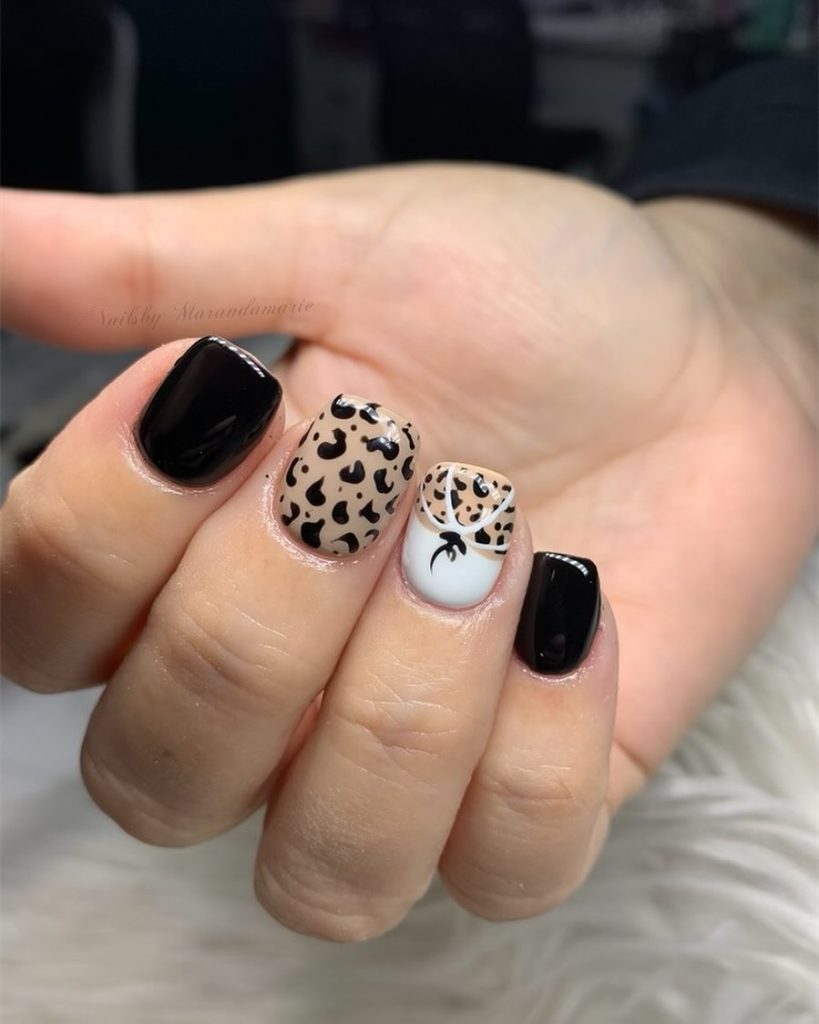
Consumables
- Black nail polish (e.g. OPI “Black Onyx”)
- Neutral-based nail polish (e.g. Essie Ballet Slippers)
- Nail art brushes for detailing
- Top coat to seal the design.
DIY instructions
- Apply a base coat to all nails.
- Paint some nails with black polish and others with a neutral base color.
- Use a thin brush to create leopard and pumpkin print designs on neutral nails.
- Finish with a top coat to seal the design.
Blue and Silver Pumpkin Art
This design features stunning pumpkin art in shades of blue and silver on short nails. The cool shades of blue and silver create a refreshing twist to traditional fall colors, making this design unique and eye-catching.
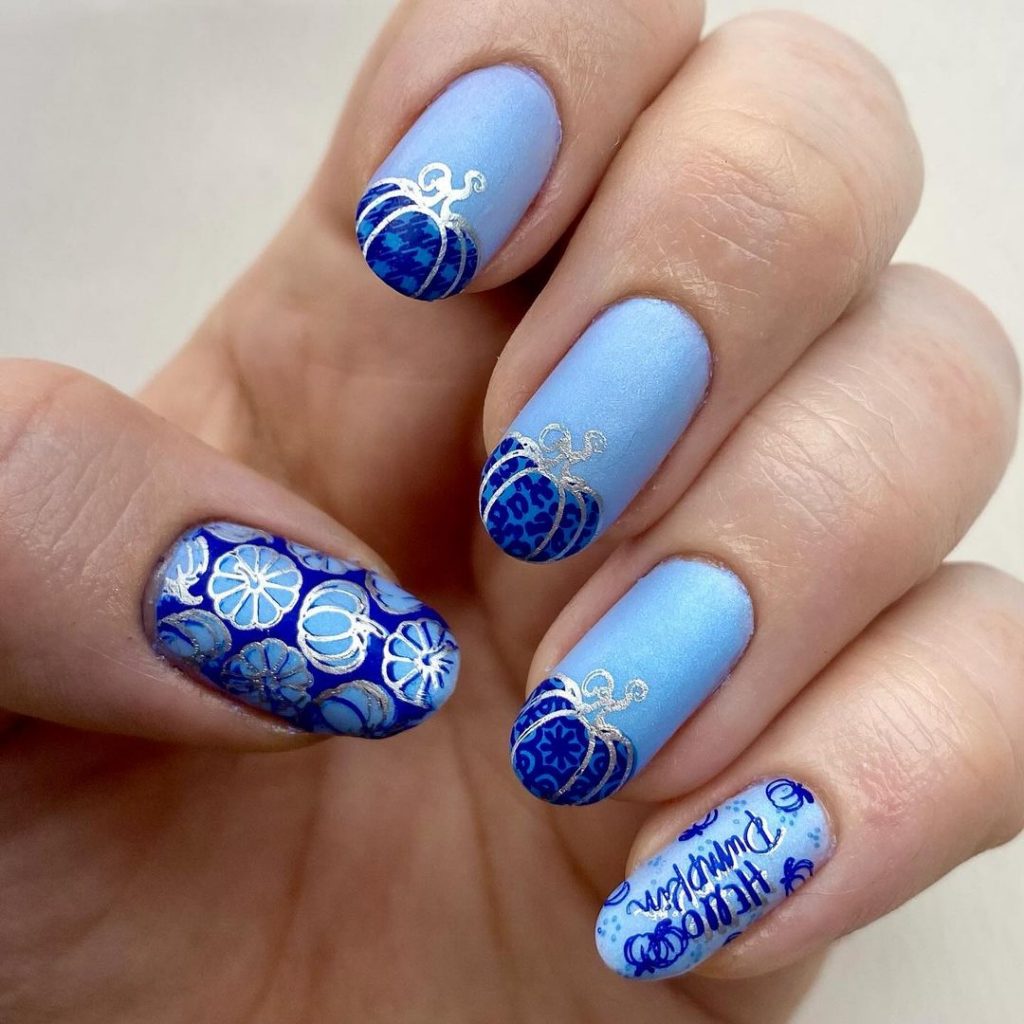
Consumables
- Blue nail polish (e.g. Essie “Bikini So Teeny”)
- Silver nail polish (e.g. OPI “Silver on Ice”)
- Nail art brushes for detailing
- Top coat to seal the design.
DIY instructions
- Apply a base coat to all nails.
- Paint your nails with a blue base color.
- Use a thin brush to add silver pumpkin designs.
- Seal the design with a top coat.
Cozy art in grey and pumpkin
This design features a mix of grey tones with elegant pumpkin and leaf designs. The combination of matte and glossy finishes adds a sophisticated touch, while the intricate designs make it perfect for the fall season.
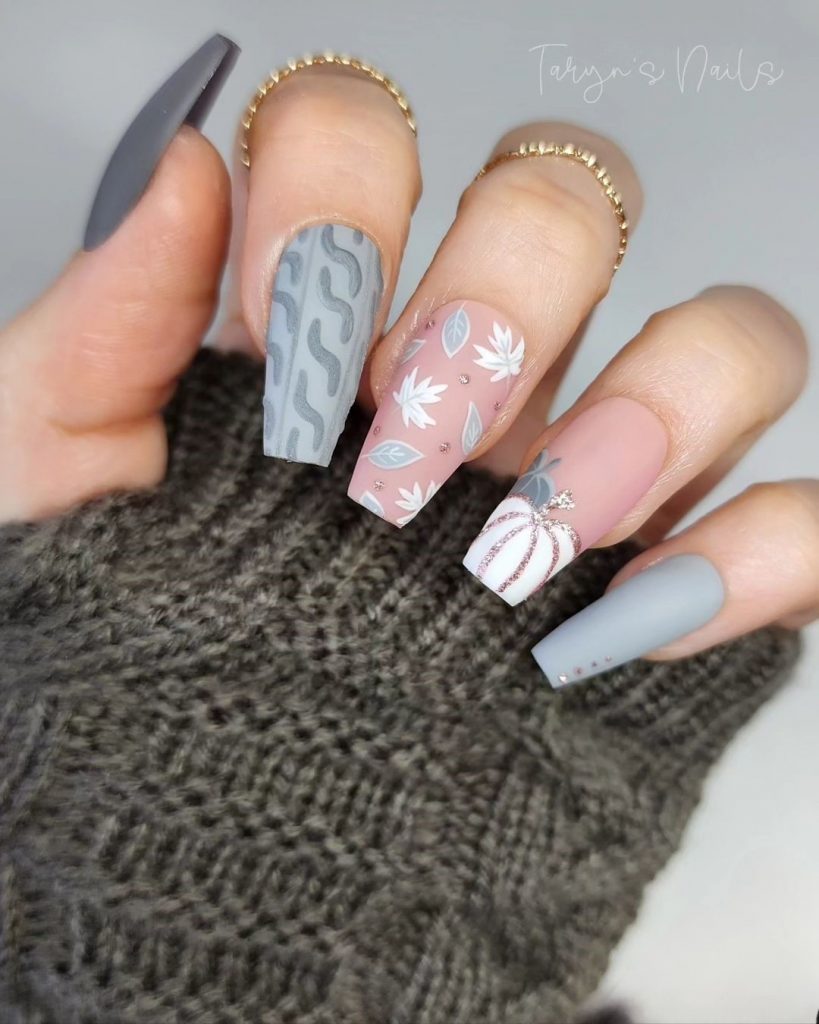
Consumables
- Grey nail polish (e.g. OPI “I Can Never Hut Up”)
- Matte top coat (e.g. OPI “Matte Top Coat”)
- White nail polish for details (e.g. Essie “Blanc”)
- Nail art brushes for detailing
- Top coat to seal the design.
DIY instructions
- Apply a base coat to all nails.
- Paint some nails with grey polish and others with a neutral base.
- Use a fine brush to add pumpkin and leaf designs with white and gray glaze.
- Finish with a matte top coat on some nails and a glossy top coat on others to create contrast.
Glowing Pumpkins
This design combines bright orange nails with pumpkin detailing on a white base. The long nails are perfect for making a bold statement, and the glitter adds a festive touch.

Consumables
- Orange glitter nail polish (e.g. “I Herd That” by China Glaze)
- White nail polish (e.g. OPI “Alpine Snow”)
- Black nail polish for details (e.g. Essie “Licorice”)
- Nail art brushes for detailing
- Top coat to seal the design.
DIY instructions
- Apply a base coat to all nails.
- Paint some nails with bright orange polish and others with white polish.
- Use a thin brush to add pumpkin designs on white nails with black polish.
- Seal the design with a top coat.
Colorful pumpkin
This design features a colorful pumpkin patch on a teal background. Short nails are ideal for showing off the vibrant colors of fall, with pumpkins in various shades adding a fun touch.
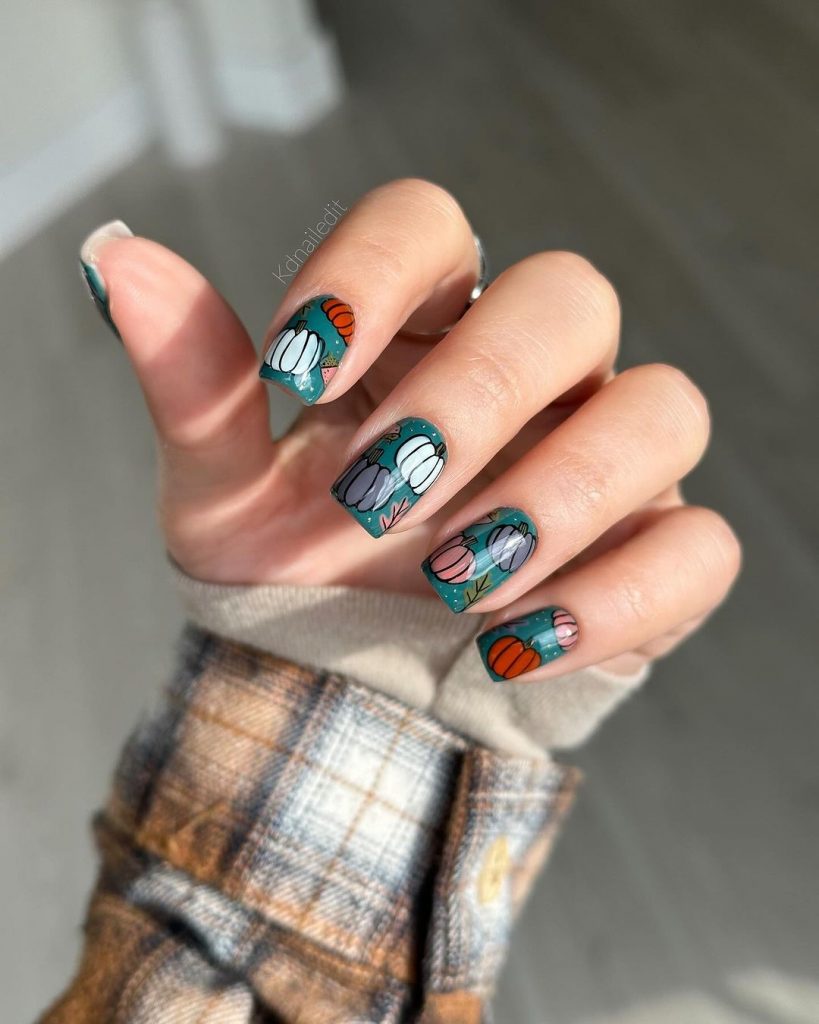
Consumables
- Teal nail polish (e.g. Essie “Go Overboard”)
- Various pumpkin colors (e.g. OPI “Big Apple Red,” Essie “Meet Me at Sunset,” OPI “Stay Off the Lawn”)
- Nail art brushes for detailing
- Top coat to seal the design.
DIY instructions
- Apply a base coat to all nails.
- Paint your nails with teal polish.
- Use a fine paintbrush to create pumpkin designs in different colors.
- Finish with a top coat to seal the design.
Pink Pumpkin Delight
This design combines a soft pink base with a white pumpkin design for a cute and feminine fall look. The almond-shaped nails add elegance, while the simplicity of the design makes it easy to recreate.
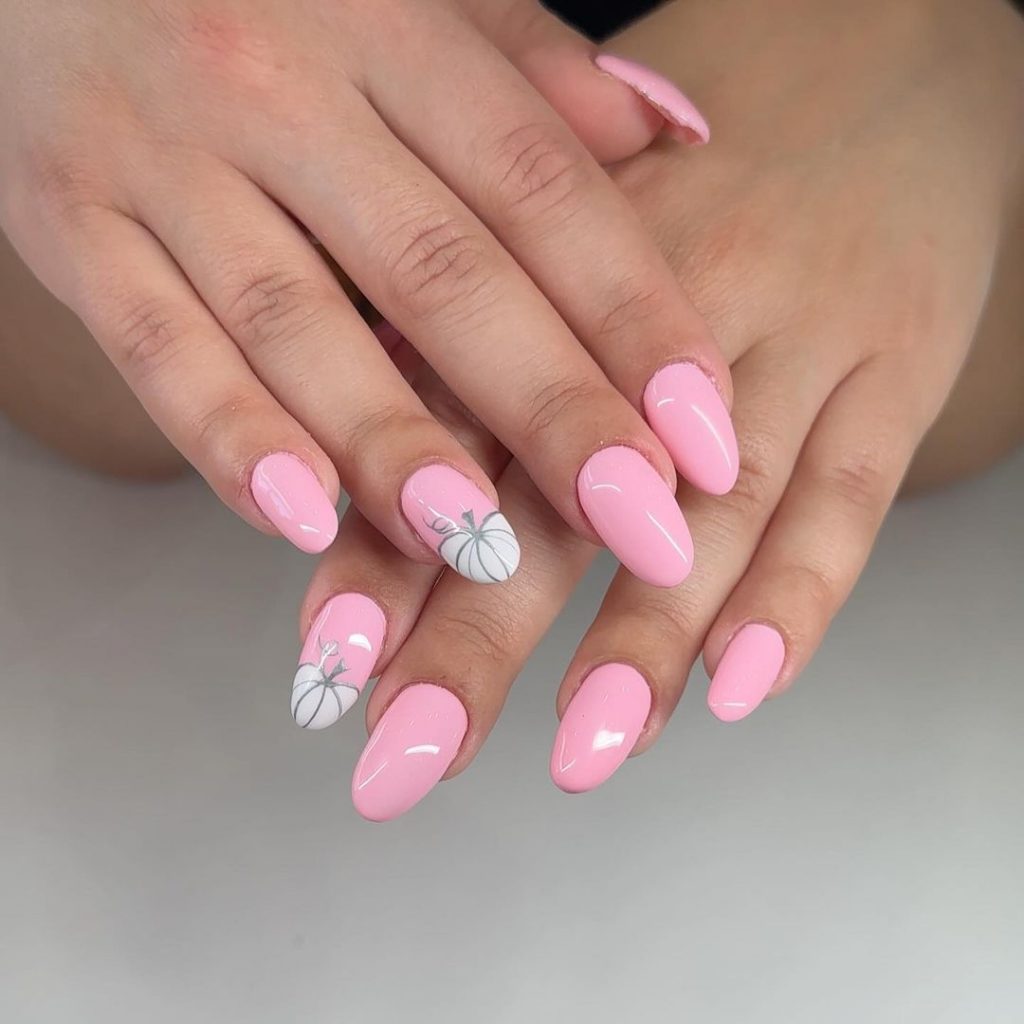
Consumables
- Pink nail polish (e.g. “Ballet Slippers” by Essie)
- White pumpkin nail polish (e.g. OPI “Alpine Snow”)
- Nail art brushes for detailing
- Top coat to seal the design.
DIY instructions
- Apply a base coat to all nails.
- Paint your nails with pink polish.
- Use a thin paintbrush to add white pumpkin designs.
- Seal the design with a top coat.
Vibrant blue and orange pumpkins
This design features a vibrant combination of blue and orange nails with pumpkin detailing. The short nails are perfect for a bright and bold fall look, with contrasting colors adding a fun touch.
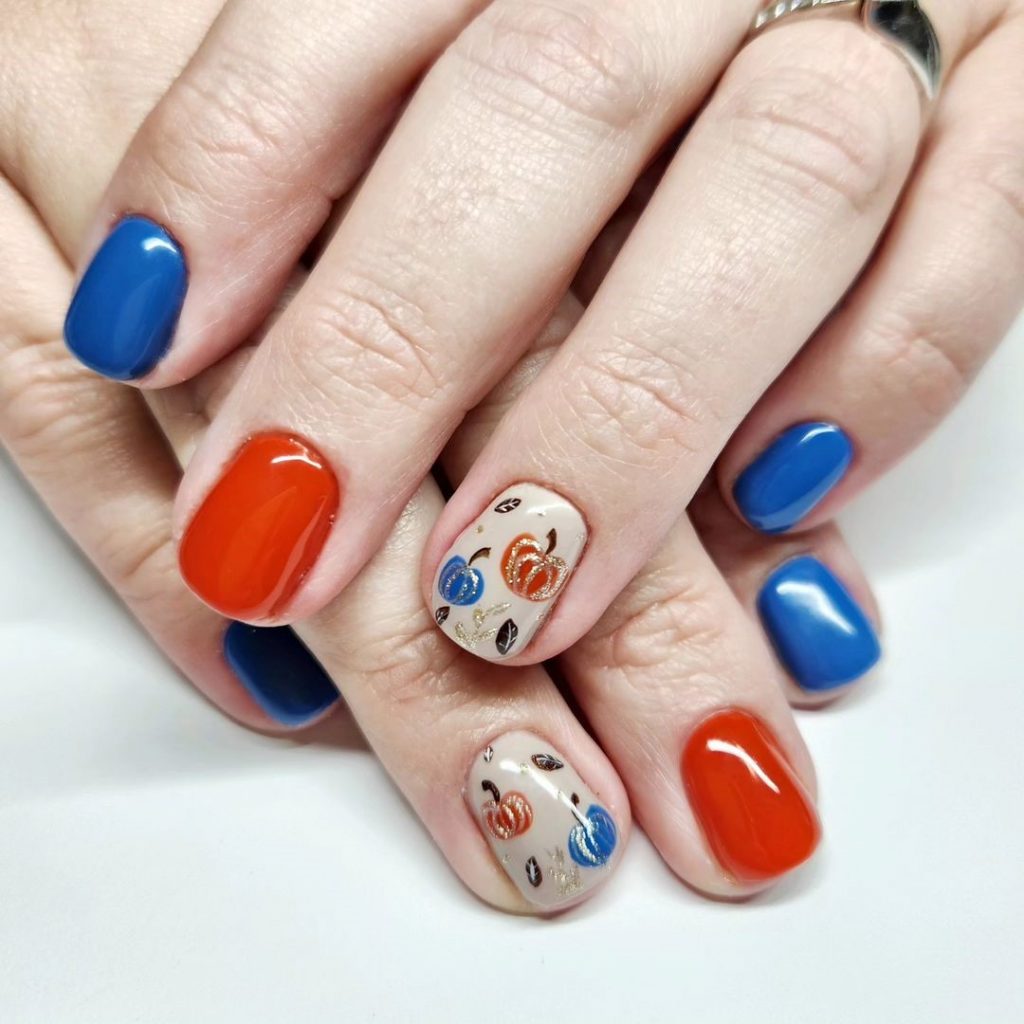
Consumables
- Blue nail polish (e.g. Essie “Bikini So Teeny”)
- Orange nail polish (e.g. OPI “A Good Man-darin is Hard to Find”)
- White nail polish as a base (e.g. OPI “Alpine Snow”)
- Nail art brushes for detailing
- Top coat to seal the design.
DIY instructions
- Apply a base coat to all nails.
- Paint some nails with blue polish, others with orange polish, and a few with white polish.
- Use a thin brush to add pumpkin designs on white nails.
- Finish with a top coat to seal the design.
Golden and glitter pumpkins
This design features gold pumpkins and glitter on a neutral base. Long nails are perfect for a glamorous fall look, with gold glitter adding a festive touch.
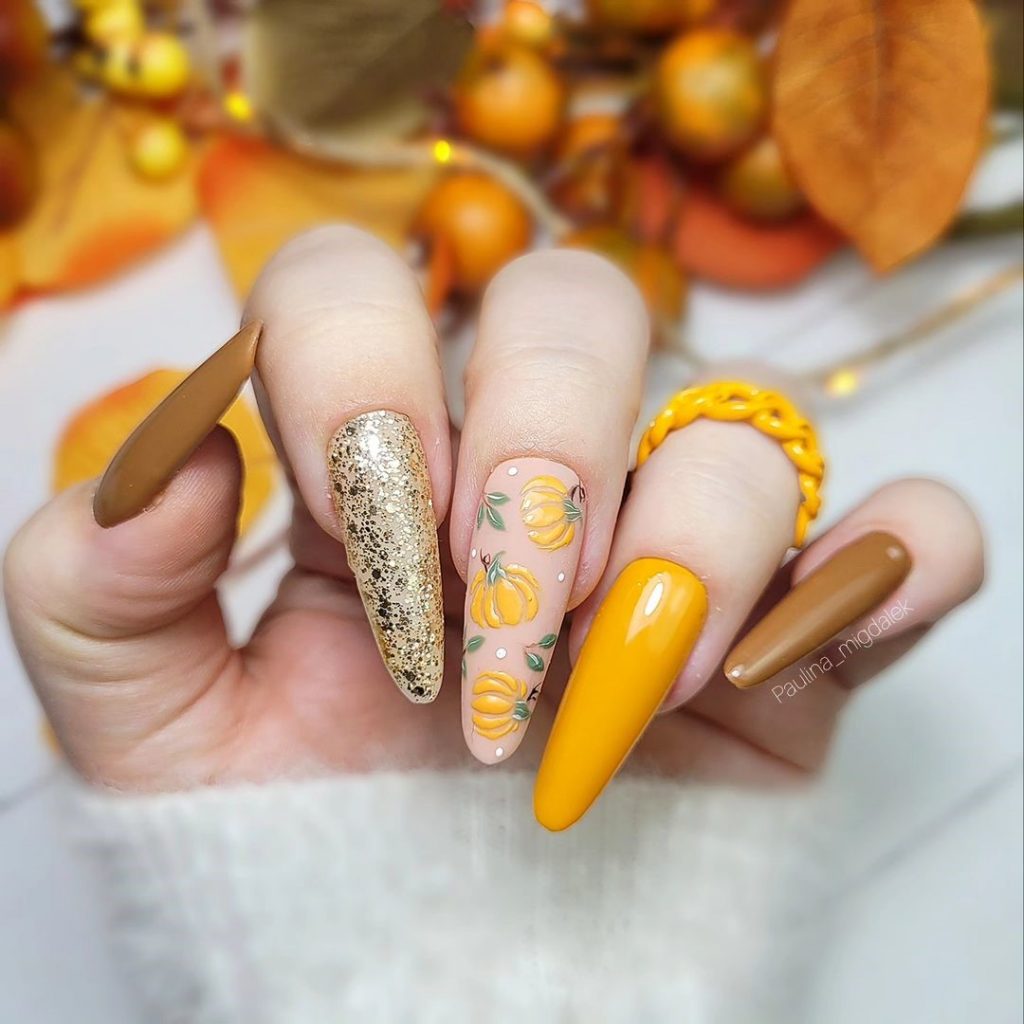
Consumables
- Neutral-based nail polish (e.g. Essie Ballet Slippers)
- Gold glitter polish (e.g. China Glaze “Golden Enchantment”)
- Pumpkin orange nail polish (e.g. Essie “Meet Me at Sunset”)
- Nail art brushes for detailing
- Top coat to seal the design.
DIY instructions
- Apply a base coat to all nails.
- Paint some nails with a neutral base color and others with a shiny gold polish.
- Use a thin brush to add pumpkin designs on neutral nails with orange polish.
- Finish with a top coat to seal the design.
Classic red and pumpkin
This design features classic red nails with a simple pumpkin detail. Almond-shaped nails are perfect for an elegant and chic fall look, with a subtle pumpkin design adding a seasonal touch.
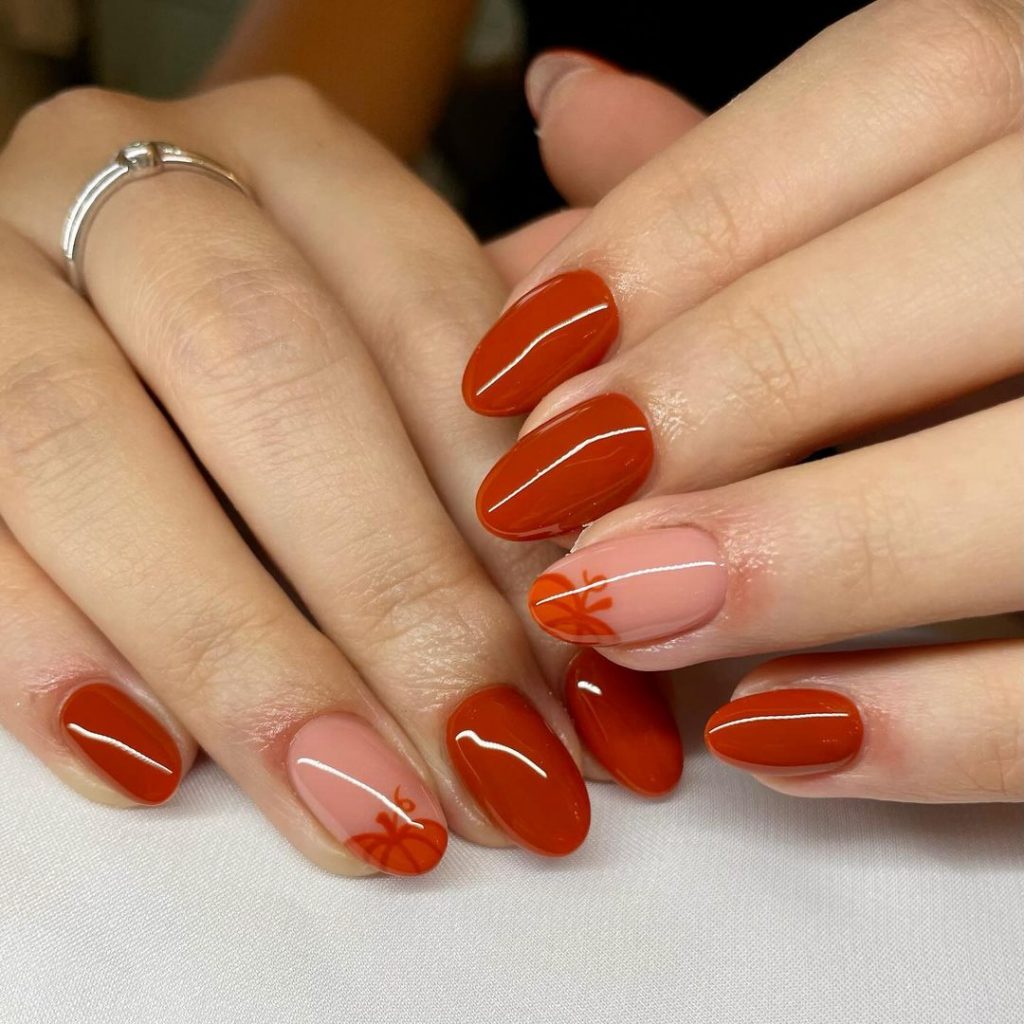
Consumables
- Red nail polish (e.g. OPI “Big Apple Red”)
- Neutral-based nail polish (e.g. Essie Ballet Slippers)
- Pumpkin orange nail polish (e.g. Essie “Meet Me at Sunset”)
- Nail art brushes for detailing
- Top coat to seal the design.
DIY instructions
- Apply a base coat to all nails.
- Paint some nails with red polish and one or two with a neutral base color.
- Use a thin brush to add a simple pumpkin design on neutral nails.
- Seal the design with a top coat.